

Why Most Concrete Paint Jobs Fail Within a Year
Here’s something nobody tells you before you buy a $40 can of floor paint: concrete is basically a sponge with attitude. It looks solid, but it’s porous, alkaline, and constantly fighting moisture from underneath. That’s exactly why so many DIY jobs peel within months.
If you’ve ever searched for advice on painting concrete and felt overwhelmed by conflicting tips, you’re not alone. Some sites tell you to just slap on a coat and call it done. Others make it sound like you need an engineering degree. The truth sits somewhere in the middle.
Whether you’re tackling a small patio or a full garage floor, the goal of any good concrete painting project is the same: a finish that bonds properly and stays put for years, not months.
This guide walks through everything that actually matters — prep work, product choice, application technique, and the small mistakes that quietly ruin good intentions when painting concrete at home.
What Makes Concrete So Different From Other Surfaces
Before getting into how to paint concrete, it helps to understand why it behaves the way it does. Wood and drywall are forgiving. Concrete is not.
Concrete is alkaline, meaning it has a high pH that can break down certain paint formulas over time. It’s also porous, so it absorbs moisture, oil, and dust like a sponge. And it cures for years — yes, years — releasing moisture slowly the entire time.
That moisture is the silent killer of most paint jobs. If you trap it under a coat of paint before it’s fully escaped, you’ll see bubbling, peeling, or a chalky white residue called efflorescence within weeks.
The Three Enemies of a Good Finish
Any successful concrete painting effort has to account for these three forces, or the results won’t hold.
- Moisture rising from below the slab
- Alkalinity that reacts poorly with regular latex paint
- Surface contamination from oil, grease, or old sealers
Knowing these three enemies upfront changes how you approach the entire project. It’s not just about color and coverage — it’s about chemistry.
Painting Concrete Floors: Indoor vs Outdoor Considerations
Not all concrete surfaces face the same challenges. Painting concrete floors indoors, like in a basement or garage, differs quite a bit from painting an outdoor patio or driveway. Anyone planning painting concrete floors for the first time should treat indoor and outdoor jobs as two separate projects with different rules.
Indoor floors deal with foot traffic, occasional spills, and temperature swings that are usually mild. Outdoor surfaces face UV rays, rain, freeze-thaw cycles, and heavier vehicle weight if it’s a driveway.
A basement floor painted with the wrong product might just look dull after a year. A driveway painted with the wrong product might flake off in chunks after one winter. The stakes are higher outside.
Indoor Floors: Basements, Garages, and Workshops
Basements are notorious for moisture issues because they sit below grade. Before you even think about paint concrete floor products, test for moisture using a simple plastic sheet taped down overnight. If condensation forms underneath, you’ve got a moisture problem to solve first.
Garages take a beating from hot tires, dripping oil, and dragged-in salt during winter. A garage floor needs a tougher film than a guest bedroom would ever require, which is one more reason painting concrete indoors isn’t a one-size-fits-all job.
Outdoor Surfaces: Patios, Driveways, and Walkways
Outdoor concrete needs UV-resistant formulas, or the color will fade and chalk within a season. It also needs flexibility to handle the expansion and contraction that comes with temperature changes.
If you live somewhere with harsh winters, freeze-thaw resistance isn’t optional — it’s the difference between a coating that lasts five years and one that’s gone by spring.
Step-by-Step: How to Paint Concrete the Right Way
This is the part most people skip straight to, and honestly, that’s fine — just don’t skip the prep once you’re here. Here’s the realistic process for how to paint concrete properly, from bare slab to finished surface.
Step 1: Clean Like You Mean It
Sweep, then degrease, then rinse. Use a concrete cleaner or a mix of trisodium phosphate (TSP) and water for oil stains. A pressure washer works wonders outdoors but indoors, a stiff brush and bucket will do.
Skipping this step is the single biggest reason paint fails. Dust and grease create an invisible barrier that paint simply cannot grip.
Step 2: Repair Cracks and Pits
Use a concrete patching compound for cracks wider than a hairline. Let it cure fully — usually 24 to 48 hours — before moving forward. Painting over unrepaired cracks just highlights them later.
Step 3: Test for Moisture and Etch the Surface
As mentioned earlier, run a moisture test. If the slab is dry, etch it with a mild muriatic acid solution or a concrete etching product. This opens up the pores so the paint or coating can actually bond instead of sitting on a slick surface.
New concrete should cure for at least 30 days before any coating goes on. Rushing this step is a guaranteed shortcut to failure.
Step 4: Prime If Your Product Requires It
Some epoxy and acrylic systems include a built-in primer step; others don’t need one. Read the can. Skipping a required primer is like skipping the foundation of a house — everything built on top is shakier.
Step 5: Apply the Coating in Thin, Even Layers
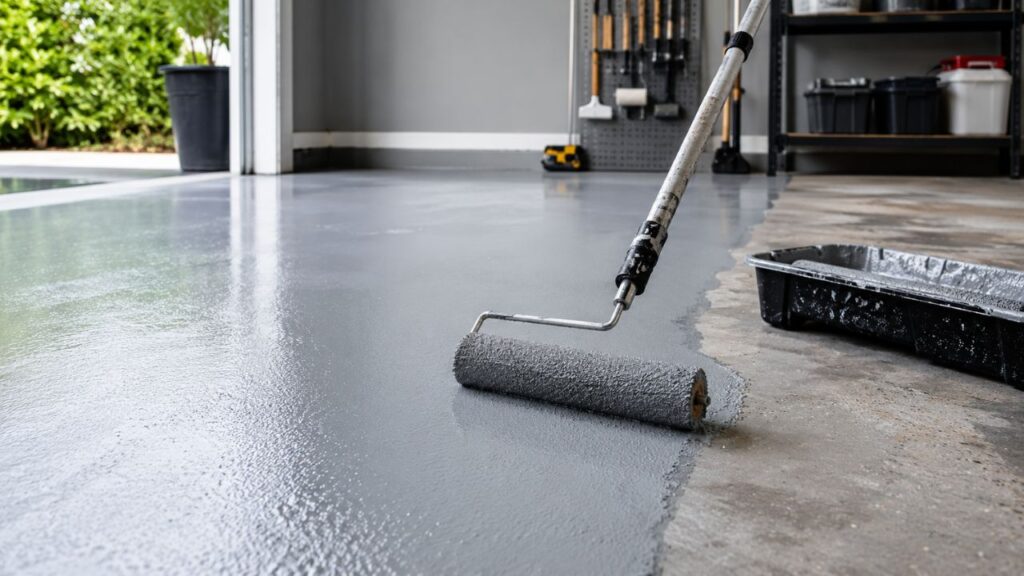
This is the heart of concrete painting, and it’s where patience pays off. Use a roller with a medium nap for texture and a brush for edges and corners. Apply two thin coats rather than one thick one — thick coats trap solvents and crack as they dry.
Step 6: Cure Time Matters More Than You Think
Walking on a “dry” floor too soon is one of the most common mistakes. Dry to the touch and fully cured are two different things. Most products need 24 hours before light foot traffic and up to a week before heavy use or furniture.
Choosing the Right Product: Paint vs Epoxy vs Stain
When people say paint concrete, they often mean one of three very different products: traditional acrylic paint, epoxy coating, or concrete stain. Each behaves differently and suits different needs.
Acrylic Concrete Paint
This is the most affordable and easiest option for DIYers. It’s breathable, which helps with moisture management, and it comes in nearly any color. The tradeoff is durability — it wears faster under heavy traffic or vehicle weight.
Epoxy Coatings
Epoxy is the heavyweight champion of garage and workshop floors. It creates a thick, glossy, chemical-resistant film that shrugs off oil drips and scuffs. The downside is the application process is less forgiving and the cost is higher.
Concrete Stain
Stain doesn’t sit on top like paint; it soaks in and reacts with the minerals in the concrete, creating a marbled, natural look. It’s popular for patios and decorative indoor floors but offers less color uniformity than paint.
Quick Comparison
| Product | Best For | Durability | Cost |
|---|---|---|---|
| Acrylic paint | Light-use indoor floors | Moderate | Low |
| Epoxy | Garages, workshops | High | Medium-High |
| Stain | Decorative patios | Moderate-High | Medium |
Best Concrete Floor Paint Picks by Project Type
Picking the right concrete floor paint depends entirely on where it’s going and how much abuse it needs to survive. Walk into any hardware store and you’ll see dozens of cans labeled concrete floor paint, but not all of them are formulated for the same conditions.
- Garage floors: Two-part epoxy kits with a polyurethane topcoat for chemical and impact resistance
- Basement floors: Breathable acrylic paint formulated for below-grade moisture
- Outdoor patios: UV-stable acrylic or elastomeric coatings built for weather exposure
- Driveways: Heavy-duty epoxy or specialized driveway sealers rated for tire traffic and de-icing salt
Reading the manufacturer’s label matters more than the brand name on the can. Look specifically for words like “below-grade rated,” “UV-stable,” or “hot tire pickup resistant” depending on your project. This small habit alone separates a successful painting concrete floors project from a frustrating do-over.
Common Mistakes That Ruin a Concrete Floor Paint Job
Even with good products, technique trips people up. Here are the mistakes that show up again and again when people try to paint concrete floor surfaces themselves, and they’re easy to avoid once you know to paint concrete floor areas with patience instead of rushing.
- Painting over a dirty or oily surface without proper degreasing
- Skipping the moisture test, especially in basements
- Applying paint in direct sun or high heat, which causes uneven drying
- Using interior paint outdoors, where UV rays break it down fast
- Not waiting long enough between coats, trapping solvents underneath
- Walking or driving on it too soon, before it has fully cured
Have you ever repainted the same garage floor twice in two years? If so, one of these mistakes was probably the culprit.
A Quick Real-World Example
A friend of mine spent a weekend painting concrete in her detached garage using leftover wall paint because it was already in the shed. By the following spring, it had peeled in long curling strips near the door where condensation collected most.
The second attempt, done properly with an etching solution and a proper epoxy kit, has now held up for over three years with daily car traffic. The difference wasn’t effort — it was the right product matched to the right environment.
Color and Finish: The Part People Forget to Plan
Gloss finishes reflect more light and make small spaces feel brighter, but they also show scuffs and dust more easily. Satin and matte finishes hide imperfections better and feel less slippery underfoot, which matters in a garage or basement.
Lighter colors show oil stains and tire marks faster than mid-tone grays, which is why gray remains the unofficial default for garage floors everywhere.
Maintenance: Making Your Paint Job Last
A painted concrete floor isn’t maintenance-free, even with the best products, and treating concrete painting as a one-time task is a common reason finishes wear out early. Sweep regularly to avoid grit scratching the surface, and wipe up chemical spills quickly since some solvents can soften certain coatings.
Reapply a clear topcoat every few years on high-traffic areas to extend the life of the base color coat underneath. Think of it like reapplying sunscreen — a small habit that prevents a much bigger problem later.
How Long Does Painted Concrete Actually Last?
With proper prep, acrylic paint on an indoor floor typically lasts three to five years before it needs a refresh. Epoxy systems, properly applied, often last eight to ten years in a garage setting. Outdoor stains and paints usually need attention every two to four years due to UV and weather exposure.
These numbers shift dramatically based on prep work. A floor with thorough cleaning, etching, and proper cure time will always outlast a rushed job, regardless of which product sits in the can.
Tools and Supplies You’ll Actually Need
You don’t need a professional contractor’s truck to get this done, but a few specific tools make the difference between a smooth job and a frustrating one.
- Stiff-bristle push broom for initial sweeping and debris removal
- Pressure washer or garden hose with a stiff brush for deep cleaning
- Concrete etching solution or muriatic acid (always diluted and used with gloves and eye protection)
- Patching compound and a putty knife for cracks and pits
- Medium-nap roller (3/8 to 1/2 inch) for textured concrete
- Angled sash brush for edges, corners, and tight spots
- Painter’s tape to protect baseboards, walls, or garage door tracks
- Respirator mask if working with epoxy or solvent-based products indoors
Skipping the respirator is more common than it should be. Many epoxy and solvent-based coatings release fumes strong enough to cause headaches or dizziness in an enclosed garage, so ventilation and protection aren’t optional extras.
How Much Does It Cost to Paint a Concrete Floor?
Budget varies a lot depending on size and product choice, but here’s a realistic breakdown for a typical two-car garage floor, roughly 400 to 500 square feet.
- Cleaning supplies and etching solution: $20–$40
- Patching compound for minor repairs: $10–$25
- Acrylic concrete paint (two coats): $60–$120
- Epoxy kit with topcoat: $150–$350
- Tools (rollers, brushes, tape): $20–$35
So a basic acrylic job might run under $150 total in materials, while a full epoxy system could land closer to $400. Compare that to professional epoxy installation, which often runs $3 to $7 per square foot once labor is included, and the DIY savings become obvious — assuming you put in the prep work correctly.
Timing It Right: Weather and Season Matter
Temperature and humidity affect how paint cures, and this trips up a surprising number of people. Most products want application temperatures between 50°F and 90°F, with low humidity for faster, more even drying.
Painting an outdoor patio in the middle of a humid summer afternoon often leads to a tacky finish that never fully hardens. Early morning or late afternoon, when temperatures are moderate, usually gives better results.
Cold weather is just as tricky. Coatings applied below 50°F can cure unevenly or fail to bond properly altogether. If you’re in a climate with a short window of mild weather, plan around it rather than forcing the project into a bad week.
A Short Story About Bad Timing
A neighbor of mine once painted his driveway on what he called “a perfect Saturday” — except it was 95°F with full sun beating down on dark gray concrete. The paint dried so fast on top that it trapped solvent underneath, leaving a slightly tacky, uneven texture that never fully smoothed out.
He ended up sanding it lightly and applying a fresh coat the following weekend, this time starting at 7 a.m. before the heat set in. The second attempt cured evenly and still looks solid years later. Sometimes the product isn’t the problem — the clock is.
Safety Considerations Worth Taking Seriously
A few safety basics get overlooked when people are excited to finish a project quickly.
- Always wear gloves and eye protection when working with etching solutions or acids
- Ventilate the space well, especially with solvent-based epoxy products
- Keep pets and children away from the area until the surface is fully cured
- Dispose of leftover chemicals according to local regulations, not down a drain
None of this is complicated, but it’s easy to forget in the rush to get a project finished before the weekend ends.
Sustainability and Eco-Friendly Options
For anyone concerned about fumes or environmental impact, water-based acrylic and epoxy hybrid products have come a long way in recent years. They typically have lower VOC (volatile organic compound) emissions than older solvent-based formulas, which matters both for air quality and for anyone working in a less ventilated space.
Look for products labeled “low-VOC” or “water-based” if this is a priority. They generally perform well for residential use, though heavy industrial environments may still call for traditional solvent-based epoxy.
Frequently Asked Questions
Can you paint concrete that’s still curing? No. Fresh concrete needs at least 30 days to cure before any paint or coating is applied, otherwise trapped moisture will cause peeling.
Do you need to seal concrete before painting it? Sealing and painting serve different purposes — most paint products replace the need for a separate sealer, but always check your specific product’s instructions.
Is it cheaper to paint concrete or replace it with tile? Painting is almost always far cheaper than replacing flooring, often costing a fraction of tile or vinyl installation for a comparable area.
Final Thoughts and Your Next Step
Getting a concrete floor to look good and stay good isn’t about luck — it’s about respecting the prep work and matching the product to the environment. Skip a step, and you’ll be redoing the job within a year. Follow the process, and you’ll get years of solid performance out of a relatively small investment.
Think back to the moisture test, the etching step, and the patience required between coats. None of those steps are glamorous, and none of them show up in the finished photo, but they’re the reason one floor lasts a decade while another peels in twelve months. The visible part — rolling on color — is actually the easiest part of the entire process.
It also helps to remember that every concrete slab is a little different. Age, location, exposure to sun or moisture, and even the original mix used when it was poured all play a role in how it accepts a coating. That’s why a method that worked perfectly for a neighbor’s patio might need slight adjustments for your own driveway.
If you’re standing in the paint aisle right now wondering where to start, start with a moisture test and a thorough cleaning. Everything else builds on that foundation, and rushing past it is the one shortcut that almost never pays off.
Action step: Before buying any product, identify whether your project is indoor or outdoor, check for moisture issues, and choose between acrylic paint, epoxy, or stain based on the traffic and exposure your floor will actually face. Write down your square footage, your climate conditions, and your budget before you ever step into a hardware store — that small bit of planning saves both money and frustration later.